
So recently we have started using Ubiquiti Unifi routers and access points. We have been using the Ubiquiti Unifi Security Gateway as our router of choice. While these are a great product there are some limitations with the GUI. For instance when you are trying to create a site to site VPN between USG’s if one is behind another router (NAT) then the VPN will not work. A simple box on the VPN page that allows you to enter your external IP address would solve the issue, but there isn’t one. So below i will detail how to set this up. It is actually not that hard.
Leave the quotes of all commands. Leave out the <> tags in commands.
- Create your VPN’s as normal, as if you were not behind a NAT. Do this through the Unifi Controller portal for each site. Use a manual IP Sec VPN.
Site 1:
Peer IP – The Public IP of site 2
Local WAN IP – The Public IP of site 1 (This site)Site 2:
Peer IP – The Public IP of site 1
Local WAN IP – The Public IP of site 2 (This site) - Log into the USG that you have behind a NAT, do this using Putty.
- Enter the IP address of the USG. For the credentials enter your ssh credentials from your cloud key. You make those during setup. You can also change them in the Controller software settings.
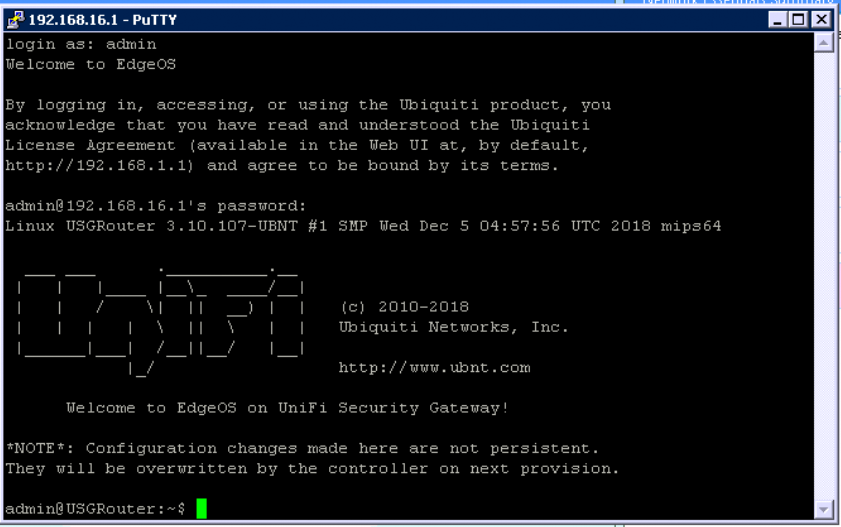
- Once in, enter the command “configure“
- Then enter the following command “set vpn ipsec site-to-site peer <Remote USG Public IP> authentication id <Public IP (This site’s public IP)>“
- Enter the command “commit;save;exit“
- The VPN should start working after a few minutes. This change is temporary and will only work until the USG is provisioned again.
- To make this permanent, you need to upload the config to the controller.
Uploading the config file to the CloudKey
Install Filezilla and use the following settings to FTP into your CloudKey.
Host: IP of the cloud key
Username: ubnt
Password: SSH password of the site
Port: 22
- In The Tree structure find your site folder – /usr/lib/unifi/data/sites/site_ID (You can find the site ID by looking in the address bar of the controller when on that site EG. https://127.0.0.1:8443/manage/s/csb2m37d/dashboard)
- Download my Config File and edit to match your setup.
- Change <Remote USG External IP> to the IP of your remote USG (the one not behind NAT)
- Then change <External IP Behind NAT(This site’s external IP)> to the external IP address of the site behind the NAT.
- When editing the file remove the <> but keep the “”.
- Drag the .JSON file into that folder
- All going well, re-provision your USG and everything should be working.
If you decide to use the code below and save the file yourself, you MUST name it config.gateway.json
Example config file
{
	"vpn": {
		"ipsec": {
			"site-to-site": {
				"peer": {
					"<Remote USG Public IP>": {
						"authentication": {
							"id": "<Public IP of NAT Site(This site's external IP)>"
						}
					}
				}
			}
		}
	}
}
Link to Config File


You are really awesome! Just one question though: does this work with the dream machine pro machines as well?
Hay mate, I haven’t got one myself to test with but I believe the firmware is the same/very similar. I cant be certain but I would say it should work.
Thanks for the detailed explanation. I’m struggling getting my S2S VPN between 2 USGs reestablished after upgrading to fiber at one end and having to use the ISP’s device (Calix Gigaspire GS2020E). Do your instructions assume any port forwarding and/or DMZ of the USG at the Gigaspire? Thanks!
Hey mate,
Yes you would need to setup a DMZ from the isp router to the unifi USG.
We have multiple remote sites, what would multiple peers look like in this file?
I think i figured it out:
{
“vpn”: {
“ipsec”: {
“site-to-site”: {
“peer”: {
“”: {
“authentication”: {
“id”: “”
}
},
“”: {
“authentication”: {
“id”: “”
}
},
“”: {
“authentication”: {
“id”: “”
}
}
}
}
}
}
}
I tried but got the below message. any idea how to fix it?
id 192.168.43.2t# set vpn ipsec site-to-site peer 12.244.xx.xx authentication
[edit]
adminveevcom@ubnt#
[edit]
adminveevcom@ubnt# commit
[ vpn ]
Use of uninitialized value $local in concatenation (.) or string at /opt/vyatta/share/perl5/Vyatta/VPN/vtiIntf.pm line 93.
Use of uninitialized value $name in exists at /opt/vyatta/share/perl5/Vyatta/VPN/vtiIntf.pm line 147.
[ vpn ipsec site-to-site peer 12.244.xx.xx ike-group ]
VPN configuration error: No IKE group specified for peer “12.244.xx.xx”.
Hey Mani,
It looks like you used the internal IP for the authentication id. You need to use the External IP for that site.
By default unifi maps the internal address, so we need to map the connection to the external IP.
set vpn ipsec site-to-site peer authentication id
set vpn ipsec site-to-site peer 12.244.xx.xx authentication id 192.168.43.2 (Change 192.168.43.2 to the External IP of that site)
I Have created this file on site behind the Nat
{
“vpn”: {
“ipsec”: {
“site-to-site”: {
“peer”: {
“185.89.xxx.xxx”: {
“authentication”: {
“id”: “213.233.xxx.xxx”
}
}
}
}
}
}
}
This is what I get on the other site
14[NET] received packet: from 213.233.xxx.xxx[500] to 185.89.xxx.xxx[500] (156 bytes)
14[ENC] parsed ID_PROT request 0 [ SA V V V V ]
14[IKE] no IKE config found for 185.89.xxx.xxx…213.233.xxx.xxx, sending NO_PROPOSAL_CHOSEN
14[ENC] generating INFORMATIONAL_V1 request 455266809 [ N(NO_PROP) ]
14[NET] sending packet: from 185.89.xxx.xxx[500] to 213.233.xxx.xxx[500] (40 bytes)
03[IKE] sending retransmit 2 of request message ID 0, seq 1
03[NET] sending packet: from 185.89.155.174[500] to 192.168.178.150[500] (156 bytes)
192.168.178.150 is the USG Behind the NAT.
What have I done wrong
Hi Martijn,
Have you created a Manual IPSec VPN for each site using the Unifi controller first?
You need to first create a VPN for each site as if you were not behind a NAT, then use the manual steps in this guide to fix the IP address.
Also did the vpn connect properly when you tested in step 5?
I have done you said this is the result
05[KNL] creating acquire job for policy 185.89.155.174/32[ipencap] === 213.233.241.122/32[ipencap] with reqid {2}
13[IKE] initiating Main Mode IKE_SA peer-213.233.241.122-tunnel-vti[4] to 213.233.241.122
13[ENC] generating ID_PROT request 0 [ SA V V V V ]
13[NET] sending packet: from 185.89.155.174[500] to 213.233.241.122[500] (156 bytes)
07[NET] received packet: from 213.233.241.122[500] to 185.89.155.174[500] (40 bytes)
07[ENC] parsed INFORMATIONAL_V1 request 3271661045 [ N(NO_PROP) ]
07[IKE] received NO_PROPOSAL_CHOSEN error notify
Hi Martijn,
The error suggests a vpn setting/config mismatch.
Without knowing the specifics of your setup it is very difficult to know what the issue could be.
Are you using 2 unifi USG devices?
YEs I’am
Hi Martijn,
As i said before, without knowing the specifics of your setup it is very difficult to know what the issue could be.
I would make sure that both the unifi USG’s are updated to the latest version.
Ensure you have used a “site-to-Site VPN” network on both devices.
Ensure you have used/entered the same “Pre-Shared Key” on both VPN’s.
Ensure you have the “Peer IP” as the opposite sites Public IP
Ensure that your NAT modem is DMZ to your Unifi USG
Failing that, I would check the Unifi Forums for that specific error.
Hi! Great Guide! it point me in the right direction but… i’m not sure about this… When you said “You need to first create a VPN for each site as if you were not behind a NAT” it means that when i create manual ipsec s2s on the natted side i have to use as local ip the USG’S WAN IP (and note the “real public IP”) then i have to set as id the real one?
I’ve read about Edge router and Ubiquiti suggest to put 0.0.0.0 as local ip but for USG doesn’t work
I’ve the same situation Martijn had in a previous post.
On the Natted side i’ve a USG 4 PRO and the -NON-NATTED side an USG 3P, last version on both
Hi Federico,
Thank You. No, by step 1 I mean create the VPN as if you did not have a NAT, using the Public IP not the internal IP.
For Example in the USG IP Sec manual VPN Page:
Site 1:
Peer IP – The Public IP of site 2
Local WAN IP – The Public IP of site 1 (This site)
Site 2:
Peer IP – The Public IP of site 1
Local WAN IP – The Public IP of site 2 (This site)
In reference to Martijn I wasn’t able to exactly ascertain what the issue was. I would have needed more site specific details.
I have only tested this with 2 USG’s.
If you have it setup with the addresses like above, run step 5 and 6. If there is an error then let me know and I can see if I can help.
Great guide and pretty straight forward. I have a USG behind a NAT and a UDM Pro that is not. I followed this guide and translated my IP’s without a hitch. However, after commit;save I do not get an error, but I cannot ping across the tunnel. Is there firewall rules that need to be done now? I am lost as to what to do now and what to check.
Thanks Ryan,
First thing I would check is that the VPN is actually connected. You can check this by running “show vpn ipsec sa” while SSH’d into the USG. You can also check the VPN status on the Unifi controller dashboard, there is a widget for it.
Also ensure that the router in front of your NAT’d unifi USG is set to DMZ all traffic to the USG.
I get no output when running the command and the widget shows that the tunnel is down. (thank you for telling me about this. I never explored that part of the dashboard.) I have suspected its my ISP for quite some time now as I have been trying to get this working for about a year now. the modem is not actually at my house. My internet is pumped to our small community from town via unifi ISP devices so I will have to check with them. Thank you very much for the reply. This has been the closest I have gotten it to work with solid evidence that I have gotten yet after trying for about a year to get this working.
No problem Ryan, yeah I wouldn’t be surprised if everyone is sharing a single public IP and the internet service through wisp devices are already double nat’d. Without being able to have your own public IP and do DMZ it would be impossible to get the VPN working. Depending on your use case you should also look at https://zerotier.com/
Dear JARROD
#1 – If I understand correctly the WAN1 interface IP should not be put anywhere
– not in the controller ui when setting up “as if we were not behind the NAT”
– not in the command to be executed on the usg
– So … the WAN1 ip of USG4PRO behind NAT – is never used – can you confirm?
#2 – I am on USG 4 PRO v4.4.55.5377109 –
The VPN should start working after a few minutes. – This does not happen.
After executing the command the shall say :
Warning: Local address 31.171.XXX.XXX specified for peer “212.183.XXX.XXX” is not configured on any interfaces.
IPsec must be re-started after address has been configured. <-ESPECIALLY THIS – IS THIS OK????
And if, after 10+ minutes I run "show vpn log" he does nothing, and failed tests stop at the time I gave the command.
Should I reboot / restart?
#3 Would this work if both are behind NAT? (of course doing same thing with inverted ips)
Hi Hideki,
1. Yes correct, you want to use the external IP of both sites when creating the VPN in the unifi controller and running the command through ssh.
2. I have only tested this with 2 “Ubiquiti USG Security Gigabit Enterprise Gateway Routers”. Although that error suggests you have used the wrong IP address when creating your VPN in the unifi controller.
3. I have not tested, but I cannot see why not.
Ideally you want to avoid running the unifi router behind another router if at all possible. If you can bridge your current router that would be much easier.
Hello Jarrod, thanks for the info. Would this method work for the Unifi Line of Gateways (USG Pro 4, UDM and UDM Pro)
Hey John,
In theory yes if they haven’t changed the CLI commands. However, I haven’t tested. It’s much better to bridge the connection or use a PFsense router if you have the option.
Hi Jarrod, do you know of a way to get this to work with a dynamic IP. The GUI has no ability to enter a DDNS name in the VPN set up. Nightmare as the most stable connection in the area behind NAT is LTE, otherwise it wouldn’t be behind the NAT and would be easy! TIA
Hey Gary,
Honestly, I would not use the Unifi line of routers for this. They are too simple and don’t offer enough customization. I would use PFsense routers instead as they offer almost any customization options you would need. You could also look at a software based vpn like ZeroTier, it works extremely well once setup.
This is great information, but I guess the UDM Pro runs a different OS?
Curious if you knew how to get the authentication id set in UDM Pro…the CLI commands don’t work.
I have a UDM Pro behind NAT and i believe this is the final step I am missing to get IPSec site2site VPN working but I have totally struck out on where to get assistance.
Thanks!
Hey Dan,
I’m sorry but I don’t have a UDM Pro to test with. I would have assumed the CLI commands would be very similar if not the same. I have stopped using the unifi routers altogether as they are lacking a lot of features. I would highly recommend bridging your main router if you can, or consider using another router in future such as PFsense.
Nice tutorial, thanks for it.
So I hesitated for a while where to add which IP – an example would be suitable for the instructions.
Unfortunately, it still doesn’t work for me 🙁
Use of uninitialized value $name in exists at /opt/vyatta/share/perl5/Vyatta/VPN/vtiIntf.pm line 147.
Use of uninitialized value $local in concatenation (.) or string at /opt/vyatta/share/perl5/Vyatta/VPN/vtiIntf.pm line 93.
Use of uninitialized value $name in exists at /opt/vyatta/share/perl5/Vyatta/VPN/vtiIntf.pm line 147.
[ vpn ipsec site-to-site peer ike-group ]
VPN configuration error: No IKE group specified for peer “”.
Warning: Local address *local public IP* specified for peer “Peer public IP”
is not configured on any interfaces.
IPsec must be re-started after address
has been configured.
Commit failed
Hi Vojťan,
I made the instructions as clear as I could. I can try to add an example in time. The error suggests you haven’t setup the VPN on each site using the unifi web GUI. Have you setup a manual IP sec VPN on each using the web interface?
Have a nice day,
YES, a long time ago. It wasn’t until long after reading the discussions that I found out that it didn’t work behind NAT.
Unfortunately, I don’t see the underlying Linux sources. And it’s not even clear to me what the UI will set wrong and which IP we’re replacing with this adjustment. So it’s a bit of a black box adjustment.
I’m via SSH (putty) on USG behind NAT.
In the command I write the public IP of the remote USG and in the authentication ID I write the IP of the local usg on the WAN port (ie the private address behind the NAT). I easily understood that. So I’ll try to fix / re-create S2S via UI and run the command again. I’ve already edited it about 100 times, maybe something on the Linux background is stored incorrectly.
Hey Vojťan,
I believe the Authentication ID should the public IP of that site. Not the private IP of the USG Wan.
So I deleted all the settings on both USGs.
Set up S2S VPN manual IPsec on both USGs. SSH via putty on usg behind NAT, released the script and unfortunately the same error.
set vpn ipsec site-to-site peer authentication id
Did you use the Authentication ID as the public IP of that site. Not the private IP of the USG Wan?
set vpn ipsec site-to-site peer “Peer public IP – WAN remote USG” authentication id “local public IP before NAT”
Oh, inserting a post will delete the contents of the parentheses.
Hi Vojťan,
I never wrote to use the local IP. You need to use the public IP’s. First is the remote site public IP and second is the current site public IP.
set vpn ipsec site-to-site peer (Remote USG Public IP) authentication id (Public IP (This site’s public IP))
Hi Jarrod, YES it fits.
I see that my previous posts are a bit confusing, because I did not notice that after saving my descriptions of IP addresses, including parentheses, were deleted 🙁
I got this message that says, “Warning: Local Address x.x.x.x (Public IP Address behind NAT) specified for peer “x.x.x.x” (Public IP on the other side no nat) is not configured on any interface
IPsec must be restarted after address
has been configured
and off course is not working 🙂
Any suggestions here?
Hi Federico,
That issue happens when the address in the command doesn’t match the address on the unifi VPN setup.
I believe you may have the addresses the wrong way around in the command or you haven’t created the vpn’s correctly in the unifi controller.
Assuming that you have already correctly created the vpn’s using the unifi interface, you then ssh into the USG that is behind the Nat. Then you run the command as listed in step 5. The first IP should be the remote site (not behind Nat) and the second IP should be the public IP of this site (the site behind Nat where you are SSH’d into)
Hi Federico G,
Did you got this to work? I have the same message when I put in the commands and 100% positive the addresses are entered correctly
Can I clarify – why do you need to specify both public IPs again in the config file even though (I’m assuming) both have already been specified in the VPN setup in the controller?
Hey tom,
I believe that’s how it knows what vpn connection to apply the settings to.
I have been trying to get this working between two USGs and one is using StarLink which is CGNAT. Will this not work as I keep seeing you saying the public IP address needs to be in a DMZ. I did upload the .JASON file to the controller in the setting for the NAT site.
Hi Diluval,
This was tested with a static IP address at both sites. CGNAT won’t work unfortunately and will cause issues.
I would recommend looking into the UniFi sd wan. https://help.ui.com/hc/en-us/articles/16750417515159-Introducing-Site-Magic-SD-WAN
Alternatively pfsense is a great alternative router with much better vpn features. You can also use it with software based VPNs such as tailscale.
Hello Jarrod!
What about if the 2 sites are behind the NAT?
Thanks!
Hey Alex,
Unfortunatly 1 site needs to have a static IP. You could look at software defined vpn solution such as tailscale.