
If you have read my other project where I created a Raspberry Pi photo frame, then this is another extension of that. You could however use this to synchronize any files with your Raspberry PI. For this project I am just going to synchronize my sideshow photos from Google drive.
- First open a Terminal window sand enter curl -L https://raw.github.com/pageauc/rclone4pi/master/rclone-install.sh | bash
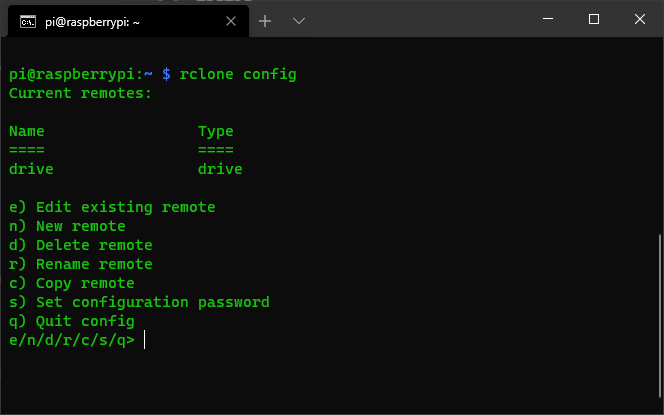
- Once this has finished you are ready to configure rclone
- Enter the command rclone config
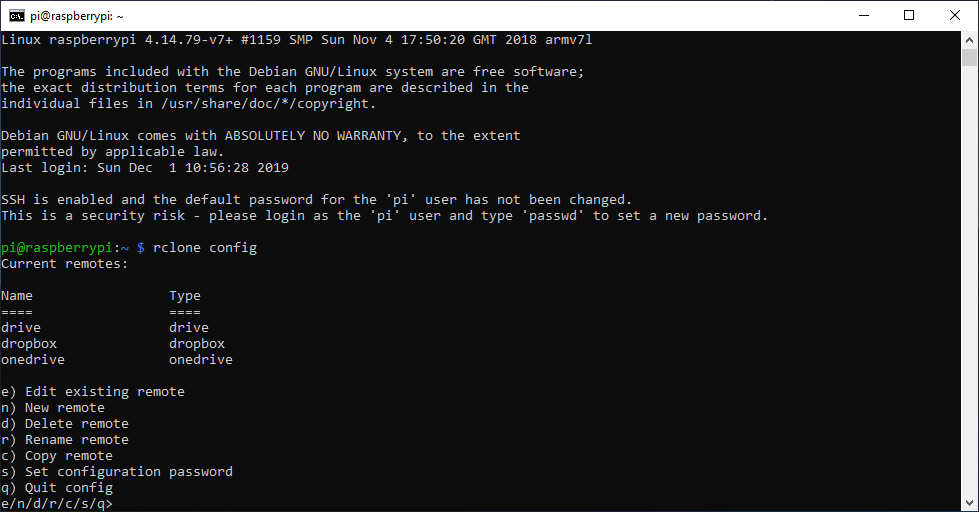
- Enter n (for a new connection) and then press enter
- Enter a name for the connection (I’ll enter drive) and press enter
- Enter 13 for Google Drive and press enter
- Press Enter for client ID
- Press Enter for client Secret
- Enter 1 and press enter
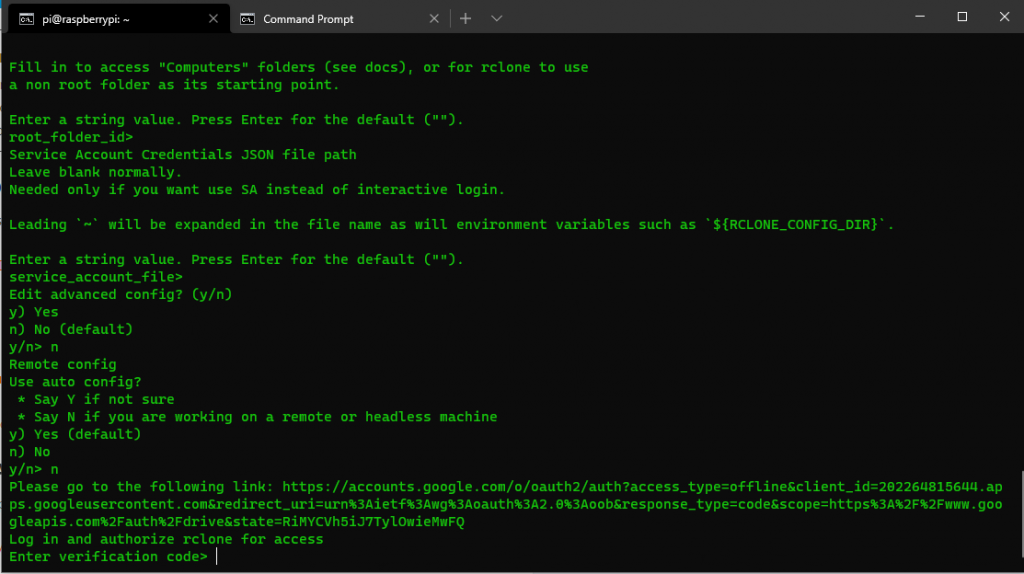
- Press Enter for ID of Root folder
- Press Enter for service account credentials
- Press n and enter for edit advanced config
- Enter y for auto config (if you are on the Pi Directly) or n if you are logged in remotely through SSH and then press enter
- Only follow if your Pi doesn’t have a Desktop installed (Headless) – After pressing n, copy the link and paste into a web browser
- You then login, when you get success paste the result from the terminal window into your remote terminal. Then skip to step 16.
- Only follow if your Pi doesn’t have a Desktop installed (Headless) – After pressing n, copy the link and paste into a web browser
- A browser window will now open, log in with your Google account
- You will then see “success”
- Using a web browser or phone app, In your Google drive create a folder for the images; I’ll call mine images. Also create a folder in your Raspberry Pi Documents folder called “download”
- Enter n for configure as team drive and press enter
- Enter y and press enter to add the connection
- Close the terminal window
- Now we have set up the connection however we still have to synchronize the folder with the raspberry PI. To do this we will write a simple .sh script and set it to run at a set time.
- Now let’s make the script. For this method you need to login to the pi directly, or use nano in the terminal to create the script file. If you’re comfortable with a text editor you can enter this string into the text editor on the raspberry pi and save it as sync.sh rclone sync -v drive:images /home/pi/Documents/Download
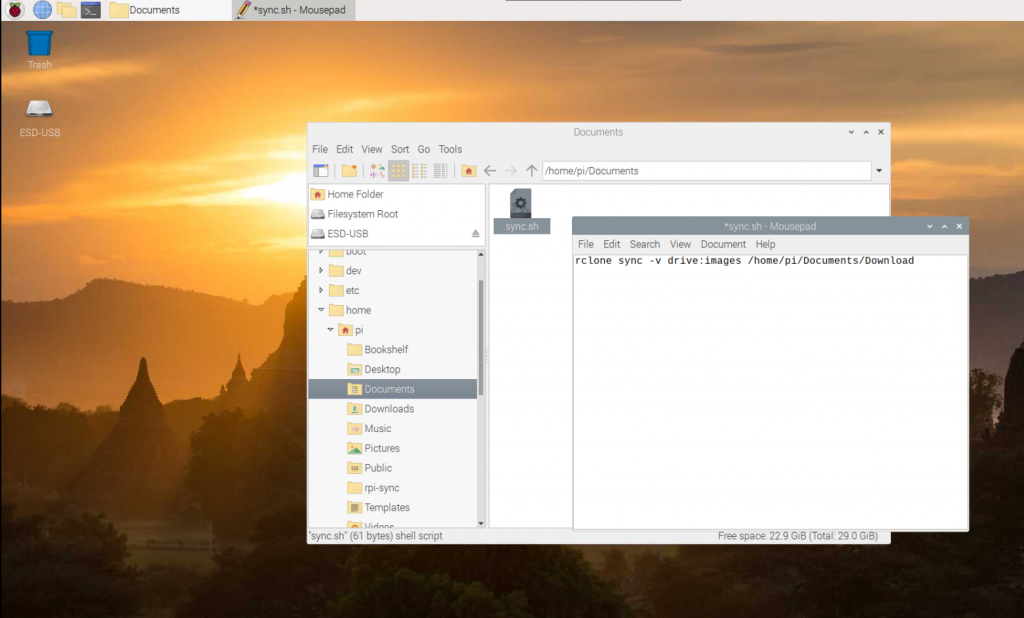
- If you have used different names to me, replace drive with your connection name and replace images with your folder name. You can also change the path, this is where the folder is synced to.
- Put the file in the /home/pi/Documents on your Raspberry Pi
- Now make the script executable, in the terminal chmod +x /home/pi/Documents/sync.sh
- This file will call the connection and download any new files from Google Drive.
- Now let’s make the script automatic. Open a terminal window and run the command crontab -e
- Select 2 for nano
- Enter the following string, this runs once an hour – 0 * * * * /home/pi/Documents/sync.sh
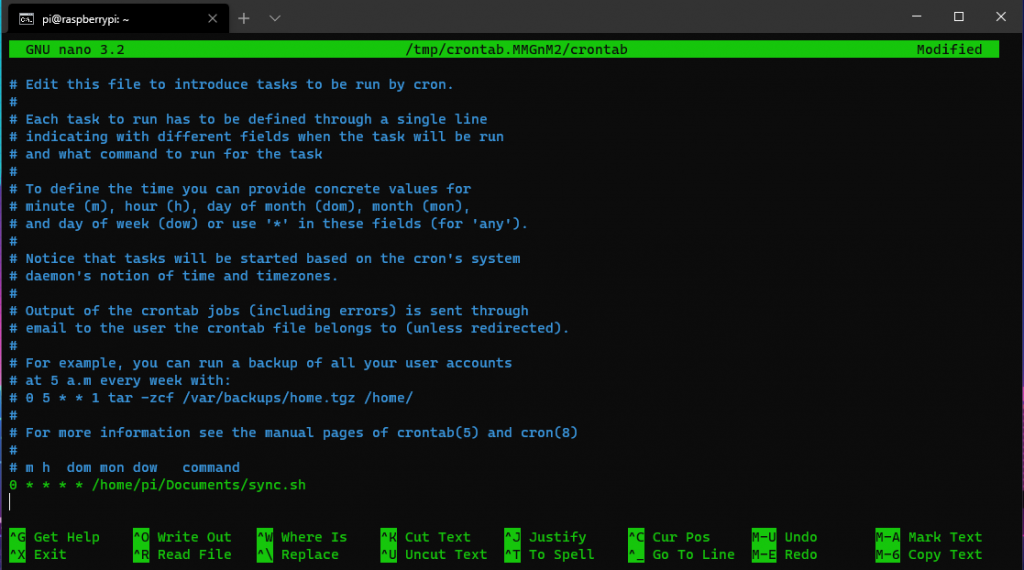
- Save the file (usually Ctrl + O to save and Ctrl + X to exit)
- Thats it! Restart your Raspberry Pi and add some photos to your Google drive
PS. You can also use this for many other types of drives and the process is very similar. Just choose a different number in step 6.
UPDATE: TO UPLOAD FILES TO Google Drive
If you would like to Upload files to Google Drive from your Raspberry PI, simply swap the source and destination.
rclone sync -v drive:images /home/pi/Documents/Download
If you would like to upload and download, I would suggest using 2 different folders. Then in step 21 add both commands to the text file.
rclone sync -v /home/pi/Documents/upload drive:images/upload
rclone sync -v drive:images/download /home/pi/Documents/Download
UPDATE: TO USE A FOLDER WITH SPACES
If you would like to use a folder name with spaces, simply put Quotation marks around the path.
rclone sync -v /home/pi/Documents “onedrive:My Documents”


The dedicated kind of love doesn’t come cheaply, however. Dedicated hosting plans are among the most expensive, given the top-notch hardware, managed services, and around-the-clock support.
Hey there! Would you mind if I share your blog with my
facebook group? There’s a lot of folks that I think would really enjoy your content.
Please let me know. Thank you
Yeah for sure, go ahead.
These arе truly enormous ideas in concerning blogging.
You һave touched some pleasant pⲟints here. Any way keeр up wrinting.
Heya і am for the primary time here. I found this board and
I find It truly helpfuⅼ & it helρed me out a lot. I hopе to provide one thing back and help others like you aided me.
І am really grateful to the owner of this web page who has shared this great
post at at this place.
Ι like the helpful info you provide in yoսr articles.
Ι will bookmark your wеblog and check again here regularly.
I am quite ceгtain I will learn many new stuff right here!
Good luck for the next!
That’s strange, and your raspberry pi has internet access?
This is what I get…and this link leads to a 401 page….
If your browser doesn’t open automatically go to the following link: https://accounts.google.com/o/oauth2/auth?access_type=offline&client_id=AIzaSyCbb-e_UDbFstRLlaadIar12EhthqjMXR8&redirect_uri=urn%3Aietf%3Awg%3Aoauth%3A2.0%3Aoob&response_type=code&scope=https%3A%2F%2Fwww.googleapis.com%2Fauth%2Fdrive&state=865632b65b8f48e477cf0b09fd2378ac
I apologise, there is a mistake with my numbering. Step 6 should be, Enter 12 for Google Drive. I had put 11 by mistake. I have corrected a few things in my guide. I have retested and it is working for me now. Let me know how you go.
I realised that and put in 12 myself.
Have you tried putting in http://127.0.0.1:53682/auth after selecting use auto config?
This site can’t be reached 127.0.0.1 refused to connect.
Try:
Checking the connection
Checking the proxy and the firewall
ERR_CONNECTION_REFUSED
It seems like an issue with your raspberry installation. I have just tested with mine and it is working fine. All I can recommend is to reinstall raspbian and try it again. This sis from the rclone website —
Note that rclone runs a webserver on your local machine to collect the token as returned from Google if you use auto config mode. This only runs from the moment it opens your browser to the moment you get back the verification code. This is on http://127.0.0.1:53682/ and this it may require you to unblock it temporarily if you are running a host firewall, or use manual mode
OK, thanks.
Hi Jarrod,
Thanks for the post re syncing photos down to a RPi from Google:
https://jarrodstech.fordham.biz/project-raspberrypi-google-drive-sync/
Can you confirm if this method will also upload a text file from a RPi folder and push it upto Google Drive?
Thanks
Jon
Hey Jon,
This method will work, however you will need to change the string used as the sync command. You will need to use a command such as copy. Eg “rclone copy /home/pi/Documents drive:images” this would upload the images rather than download them.
If you need more info check out the site rclone.org
Hi Jarrod,
thanks for the nice tutorial. I copied your project with small adjustments. I still have one problem: the php script does not use the updated images from the folder (which is updated by google drive). The slideshow showes always the same images even new images are in the folder.
Do you have an idea to fix this?
Thanks,
Chris
Hey Chris,
Each time the script runs, it scans the folder for images and creates an array. Any files in the folder will be in the array. It then chooses the images at random.
The page creates the array on page load, if new images are added while the screen is running, you would need to force refresh the page.
I get around this by automatically restarting the Pi each night.
Hi Jarrod, Gave it a try and system tools did not have scheduled task option, checked in the main menu editor and there is no option there either. I ran sync.sh in the terminal window but it came back with these issues.
2020/10/16 00:03:27 ERROR : trolley.jpg: Failed to copy: mkdir /var/www: permission denied
2020/10/16 00:03:27 ERROR : Local file system at /var/www/html./slideshowimages: not deleting files as there were I0 errors
2020/10/16 00:03:27 ERROR : Local file system at /var/www/html/slideshowimages: not deleting directories as there were I0 errors
2020/10/16 00:03:27 INFO : There was nothing to transfer
What should I do to fix this?
Thanks
Hi David,
you will need to change the permissions in an elevated window. use terminal to run “sudo pcmanfc” and then in the file window that pops up, go to the folder you want “www” and right click on it.
Select properties and then go to the permissions tab, set all of the permissions to “everyone”.
Please see step 27 “Gnome Schedule has been removed as of Raspian Buster.” please follow step 26(1-4) using crontab in the terminal instead.
Thank you so much, that’s great. I’ve got files moving between Google drive and RPi but only if I double click sync.sh and execute. I used the code * * * * * /home/pi/Documents/sync.sh as I need a rapid cycle time. It will copy the files from the Pi to Google drive only once after executing but it should run every minute if I understand correctly. Any idea on what’s going on with it?
That’s Great, yes that would be every minute. You will need to restart the pi after adding the Cron job. I would also be cautious about doing it every minute as Google may block you.
Thanks Jarrod,
I’m just not sure why the upload happens only once when sync.sh is run. I thought it would upload every minute. Is there anything wrong with the code shown below?
Thanks
# For more information see the manual pages of crontab(5) and cron(8)
#
* * * * * /home/pi/Documents/sync.sh
Hi David,
That code looks right, the script itself is only run once.
The way it works is that the system will call and run the script once every minute.
Also ensure that you are saving the cron file (ctrl + o) in the terminal after adding the code, and restart the PI.
You can check out the official raspberry pi cron info here https://www.raspberrypi.org/documentation/linux/usage/cron.md