

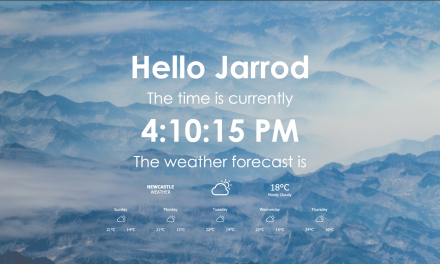
This is a project I have been working on for my house. It makes a nice Photo Display with weather, date and time, and a daily quote . It can be easily customized to suit your needs. Below I will detail the project and how to set it up on a Raspberry Pi. This is an updated version.
Installing Raspberry Pi OS
- Download and install Raspberry Pi Imager from Raspberry Pi Software Site
- Insert your micro SD card into your computer. (I use a little USB adapter)
- Open the software and select “Choose OS”

- Select “Raspberry Pi OS (32 Bit)”for the system

- Then select “Choose Storage” and select your SD Card

- Select “Write” and select “Yes” when prompted

- Once it is finished, eject the SD Card and put it in your Raspberry Pi. Connect your Pi to a screen and keyboard / mouse.
- Go through the setup process to configure your Pi. Once you are on the desktop screen, follow the next steps.
- Select the start menu -> Preferences -> Raspberry Pi Configuration

- Select the “Interfaces” tab and enable SSH and VNC

Setting up the Web Server
- Open a terminal on the PI. You can also use SSH
- Next we will need to install Apache, Open the terminal and run the following steps.
- Install – sudo apt-get install apache2 -y

- Install PHP – sudo apt-get install php libapache2-mod-php -y

- Open the terminal (as you need elevated privileges to move files), and run the command – sudo pcmanfm

- Download my files GitHub – maybejarrod/pi-photo-frame: A simple Raspberry Pi photo frame web page built on PHP. extract the zip file and add the files to the explorer windows from step 5 – /var/www/html folder.

- Add your own images to the “slideshow-images” folder and the system will automatically find them.
Set up full screen chrome
- Back in the terminal, run the code below to disable the screen from going off and disable the mouse cursor when chrome is full screen.
- sudo apt-get install -y chromium-browser ttf-mscorefonts-installer unclutter x11-xserver-utils
- Now run this line to bring up the auto start file
- sudo nano /etc/xdg/lxsession/LXDE-pi/autostart
- In the text editor that pops up change the line @xscreensaver -no-splash to #@xscreensaver -no-splash
- Next add the following (Note: The dashes before each word are double dashes – -)
@chromium-browser –kiosk –start-maximized –incognito http://localhost
@unclutter
@xset s off
@xset s noblank
@xset -dpms
- Press CTRL + o then Enter to save the text editor. Press CTRL + X to exit the text editor.
- Run the command sudo chmod 777 -R /var/www/html this will allow the PI to read files from these folders.
- Run the command to install XML sudo apt-get install php-xml and select y
- You can edit the xml data.jason file to change some of the options.
- Restart the PI.
- And that’s it you should now have a working information screen / sideshow. Feel free to edit the page however you like. Plug it into a nice monitor and enjoy. You could also share the web folder via samba and add photos via the network. How To: Raspberry Pi Shared Folder
- Also if you need to close the sideshow to work on the PI just press Ctrl + Shift + Q


Hi Jarrod, It seems that my weather and news feed channels only get updated upon restart – is it designed to constantly update throughout the day? I changed the default 14000 to 30000 so that the images appear longer on the screen. Many thanks for your help.
Hey Doug,
No problem 🙂
It was designed to, however something may have changed. I’ll check into it.