

I have started using an android tablet with fully kiosk to control my smart home. While I was looking at different options for the interface, I came across TileBoard. It’s an awesome dashboard with a lot of features. It can be a little tricky to customize and takes time to configure just right for your needs.
Download and Install
- Go to the TileBoard github and download the latest release.
- In Home Assistant go to Settings -> Add-ons
- Press the blue “ADD-ON STORE” button and search for samba
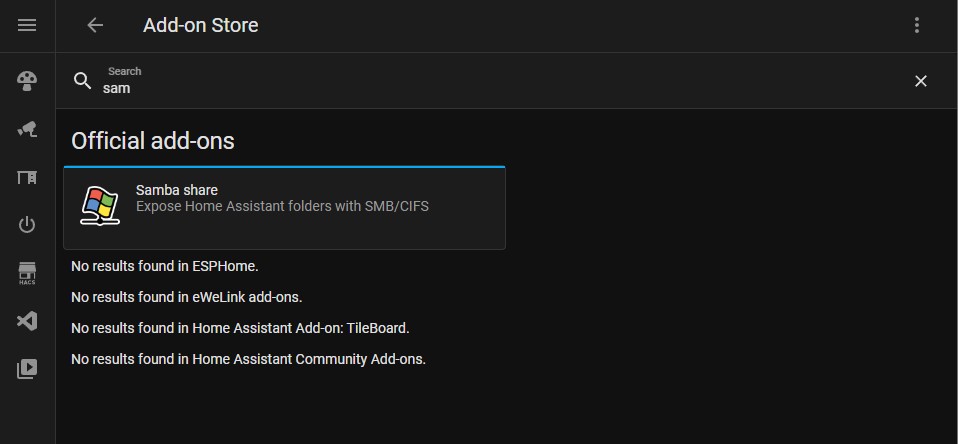
- Install the Samba Share add-on.
- Once installed, Press the “configuration” tab in the Samba share add-on

- Enter a username and password for the share and select save at the bottom
- On your computer open the file explorer and enter \\<Your Home assistant IP>, then enter the username and password
- You will then see your home assistant folders appear

- Go to the folder \\<Your Home assistant IP>\config\www, make a folder called “tileboard”
- Extract the files from the ZIP file downloaded in step 1, copy those files to this location in home assistant. (\\<Your Home assistant IP>\config\www\tileboard)

- Rename the config.example.js to config.js
- This will give you the default dashboard, go to http://<Your Home assistant IP>:8123/local/tileboard/index.html to view it
Configure the Dashboard
- Head back to the Home Assistant add-on store in Settings -> Add-ons
- Download and install the “Studio Code Server” add-on

- Once installed, check that it is running and tick the “Show in sidebar” option

- Select open web UI and you will be taken to VS Code.

- From here you can go to www -> tileboard and press on the config.js file
- This is where you can change and enter your own entities.
Switch example
I’ll detail how to change a switch button on the tile board screen.
The page starts with the following. First is the page, inside is the title background and icon. Then are the groups, groups dictate the vertical columns on the page. Each group then has items that are the individual buttons and entities. You can copy a button or entity simply by copying everything within and including the {} also remember to put a comma after each one. 
The following is the button for my shed door. The button is everything in between the {}. The first digit in position is the column in the group. The second digit is the row of the button. You can show custom states depending on the type of entity. You can also change the icons for closed and opened. Use the link at the bottom to find icons. You will need to get your entity ID for the device you want to control and put it in the ID section.

You can find your entity ID by going to settings -> Devices and Services. Select the Devices tab and select your device. Then press on the attribute you want to control and it will bring up the entity ID. 
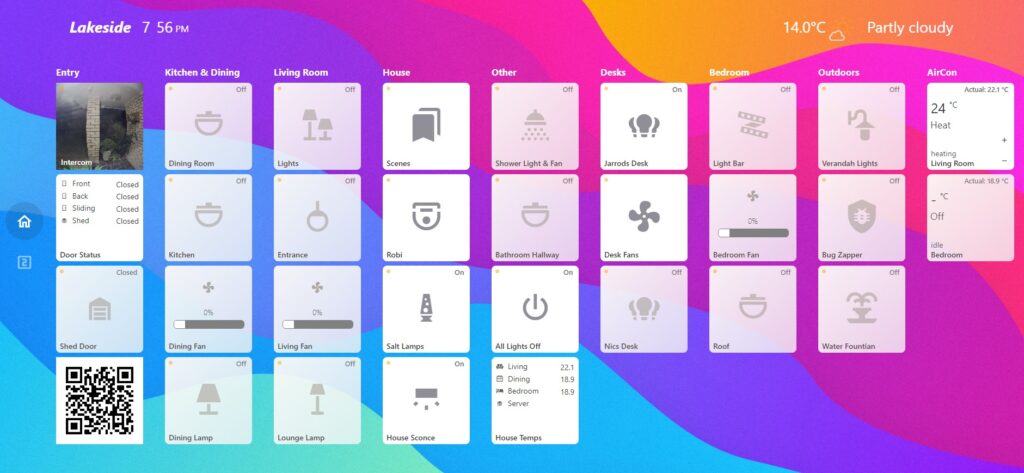
My Setup
I will attach my setup config and images for reference. If you want to use a tile or my whole board, you can copy the config file.


Recent Comments